Leaving cookies and milk for Santa is something we always do in this house. Call it appreciation for the gifts he will bestow, offering some Gluten Free sustenance for a long night or maybe even just a little extra assurance that Santa will know we have been nice this year, not naughty. Every year it is something different. This year we are leaving Gluten Free Santa’s Thumbprint Cookies. We thought maybe he would feel a twinge of recognition and know how grateful we are. For maraschino cherries without red dye or corn syrup, try these. If you put out cookies for Santa, what kind do you leave? Gluten Free Santa’s Thumbprint Cookies Ingredients 4 cups pastry quality gluten-free flour 1 tablespoon baking powder ¾ teaspoon salt 1 cup unsalted butter, at room temperature ¾ cup granulated sugar ¾ cup corn syrup or light agave nectar 1 large egg 2 teaspoons pure vanilla extract ½ cup sanding sugar (or just more granulated sugar) One 11 ounce bag semisweet chocolate chips 24 maraschino cherries, cut in half and dried well Directions Whisk together the flour, baking powder and salt and set aside. Cream together the butter and ¾ cup sugar with an electric mixer. Add the corn syrup, egg and vanilla and mix well. Gradually add the flour mixture, with the mixer on low, and beat until combined. With a spatula, scrap the sides and bottom of the bowl to make sure everything is mixed well. Roll the dough into 1 inch balls then roll in the sanding sugar and place on a plate or baking sheet – you can put them on top of each other – and refrigerate for 30 minutes. You can make ahead of time but if they are refrigerated for more than 30 minutes you will have to let them sit out for a few minutes before proceeding. Preheat oven to 350 degrees. Line 2 cookie sheets with parchment paper or silicon baking mats. Place the balls on the prepared cookie sheets about an inch apart. Flatten with your thumb, making an indentation in each ball. Bake for 10 – 12 minutes or until firm but not beginning to brown. Leave oven on. If the indentations have risen, use the end of a wooden spoon to depress again. Fill each indentation with a teaspoon of chocolate chips. Return to oven for 2 minutes. Using a small offset spatula or spoon, swirl the chocolate chips to melt. Top each cookie with a maraschino cherry half. Want to know more about your favorite Gluten Free Recipe or how to avoid being bothered by Celiac with our range of Gluten Free Recipes which are made from Gluten Free raw material feel free to visit us at: http://www.simplygluten-free.com Article Source: http://simplygluten-free.com/blog/2011/12/gluten-free-santas-thumbprint-cookies-recipe.html
Some of my gluten free recipes are pretty naughty; filled with sugar, butter, cream, fat and calories. Some of my recipes are what we might call nice; not just gluten-free but grain-free, dairy-free, sugar-free and low in fat and calories. Some might say that my nice recipes are delish enough to seem naughty and some might say that my naughty recipes are very, very nice. These cupcakes are definitely nice with just a hint of naughty; they are a remake of a very naughty old family favorite – chocolate cherry cupcakes. I took a gluten-free cupcake recipe that was filled with gluten-free flour, starch, sugar and butter and made it grain-free, dairy free and very low in refined sugar. They’re a little naughty because they are packed with chocolate chips and maraschino cherries and topped with a sinfully rich, dairy free, whipped chocolate ganache. But in defense of the naughty let me just say that chocolate is filled with all sorts of health benefits and you can even get maraschino cherries that are free of red dye and corn syrup Gluten Free Almond Chocolate Cherry Cupcakes Ingredients 1 cup coconut milk 2 tablespoons pure vanilla extract – use divided 1 ¾ cups dairy free chocolate chips – use divided 2 ½ cups blanched almond flour 2 teaspoons baking powder ½ teaspoon kosher or fine sea salt 3 large eggs, separated ¼ cup grapeseed oil ¾ cup agave nectar ½ teaspoon pure almond extract ½ cup maraschino cherries – drained, dried and roughly chopped 12 maraschino cherries with stems for garnish Slivered almonds for garnish Directions Preheat oven to 325 degrees. Line a standard 12 cup muffin pan with paper liners. Make the frosting by bringing the coconut milk just to a boil in a saucepan. Turn off the heat, stir in 1 tablespoon of vanilla extract and 1 ¼ cup of the chocolate chips. Let sit for 5 minutes then stir well until the mixture is smooth and glossy. Pour into a medium mixing bowl and refrigerate until cold, at least half an hour. In a mixing bowl, whisk together the almond flour, baking powder and salt. Put the egg yolks in one mixing bowl and the egg whites in another. Beat the egg whites on high speed until stiff peaks form. Add the remaining tablespoon of vanilla to the yolks along with the oil, agave and almond extract. Beat on high speed until the mixture becomes thicker and lighter in color, about 2 minutes. Take a scoop of the beaten egg whites and stir into the yolk mixture. Fold the remaining whites into the yolks. Add the flour mixture and fold in until fully combined. Add the remaining ½ cup of chocolate chips and the chopped cherriesand mix. Divide the batter among the prepared muffin cups and bake for 30 minutes or until the cupcakes are browned, feel springy to the touch and a tooth pick inserted into the center comes out clean. Let cool in the pan for 15 minutes then remove to a wire rack to finish cooling. When the frosting is cold, whip it on high speed with a hand held mixer until fluffy. Frost the cooled cupcakes and garnish with a maraschino cherry and a couple slices of almonds. Want to know more about your favorite Gluten Free Recipe or how to avoid being bothered by Celiac with our range of Gluten Free Recipes which are made from Gluten Free raw material feel free to visit us at: http://www.simplygluten-free.com Article Source: http://simplygluten-free.com/blog/2011/10/gluten-free-almond-chocolate-cherry-cupcakes-recipe.html
Once upon a time a caprese salad, bursting with fresh tomatoes, basil and mozzarella met up with a gluten free pasta salad. They fell instantly in love. The resulting love child of this auspicious union was the gluten free caprese pasta salad. A love story if ever I heard one. Gluten Free Caprese Salad Ingredients 1 – 16 ounce package gluten free rice pasta (shells, elbows or spirals) 1 ½ cup loosely packed fresh bail leaves, use divided 1 clove garlic, minced Zest and juice of 1 lemon ½ teaspoon kosher or fine sea salt ½ teaspoon freshly ground black pepper 1/3 cup olive oil (maybe a tad more) 1 pint cherry or grape tomatoes, halved 6 ounces bocconcini (small mozzarella balls), quartered Directions Cook the pasta in heavily salted water 1 or 2 minutes less than the package instructions until just al dente. Drain well and put the pasta into a large serving bowl. While the pasta is cooking combine 1 cup of the basil with the garlic, finely grated lemon zest, lemon juice, salt and pepper in a blender and blend until the basil is finely minced and the mixture is combined. Take the plastic top insert from the top of the blender out and slowly stream in the olive oil with the machine running. You want a thick dressing but not as thick as mayonnaise. If the mixture is too thick, add more olive oil. Once the pasta is cooked and drained pour the dressing over the warm pasta. Toss well and let cool. Roll the remaining basil leaves up like a cigar and cut into thin slices with a sharp knife. When the pasta has cooled, add the basil, tomatoes and bocconcini. Cover and refrigerate for at least half an hour or up to two days. Taste and adjust seasoning with more salt and pepper if needed. This gluten free recipe serves 6 – 8 people. Article Source: http://simplygluten-free.com/blog/2011/09/gluten-free-caprese-salad-recipe.html
As we come to the end of summer we also come to the end of the sweet cherry season. Just when I was starting to take for granted lush, ripe, juicy cherries I realized it was time to start REALLY appreciating them and using them in as many gluten free recipes as I can before they were gone for this year. So along with blending some into smoothies and baking them into muffins and pies I decided to venture out into other parts of the menu – the appetizer for example. What’s that you say? Cherry appetizers? Seriously? Yep, seriously! Baked with creamy brie and another summer favorite, basil, cherries make for a sophisticated yet seriously simple starter. But don’t take my word for it, throw together this recipe and see for yourself. But hurry! Cherry season is almost over. Oh and if you don’t already have one, this would be a good time to invest 5 or 10 dollars in a cherry pitter. This one, you can take my word for – they work great! Baked Cherry and Brie Appetizer
Ingredients2 pounds sweet cherries, pitted ½ teaspoon kosher or sea salt Large pinch black pepper ¼ cup loosely packed fresh basil leaves, chopped 1 – 7 ounce round of brie 8 slices gluten-free bread 4 sprigs of fresh basil for garnish DirectionsCombine the cherries, salt, pepper and chopped basil in a mixing bowl. Cover and refrigerate for at least 2 hours and up to a day ahead. Preheat oven to 350 degrees. Place on rack in the top third of the oven and the other rack in the bottom third. Slice the crusts off the gluten free bread and cut each slice in half diagonally to make triangles. Lay on a baking sheet. Divide the cherries along with any accumulated juices into 4 ramekins. Cut the rind off the round of brie and cut into quarters. Place the brie quarter on top of the cherries. Place the ramekins on a baking sheet. Put the bread on the top shelf of the oven and the cherries on the bottom. Bake for 10 – 12 minutes or until the bread is toasted and the cheese is melted. Garnish each ramekin with a sprig of fresh basil and 4 toast triangles and serve immediately. A gluten free recipe that serves 4 people (or 1 really greedy cherry lover like me!). Want to know more about your favorite Gluten Free Recipe or how to avoid being bothered by Celiac with our range of Gluten Free Recipes which are made from Gluten Free raw material feel free to visit us at: http://www.simplygluten-free.com Article Source: http://simplygluten-free.com/blog/2011/08/gluten-free-baked-cherry-and-brie-appetizer-recipe.html
Simple, gluten free recipes often already exist if we look outside of our own culture. When my friend Claudia, who is from Ecuador, told me about a delicious little cheesy biscuit-type bread called “Pan de Yuca”, I just knew I had to try them. Made with tapioca flour, these could not be simpler – there is no combining different flours, no xanthan or guar gum, no special equipment and no gluten free baking anxiety. In Ecuador, yuca bread is sold in small shops and street stands everywhere along with fruit yogurt. I love the bread but honestly am not a fan of eating cheese bread with yogurt. I don’t know why, I guess I am just not Ecuadorian enough. So I decided to come up with my own compliment to these easy, cheesy breads – a spicy mango marmalade. The marmalade is as simple as the yuca bread, 4 ingredients, 15 minutes, no pectin, and no sugar. Don’t we just love that? The sweetness of the mangoes is enhanced with Wholesome Sweeteners Organic Raw Blue Agave Nectar and then to balance it out, I added the juice and zest of 1 lime and a red chili pepper (picked from my own garden!) The marmalade is sweet, with a little heat, and a little acid – perfect! I was really lazy and used a one pound package of frozen mango chunks but feel free to use fresh mangoes. This combo of the gluten free yuca breads and the sugar free spicy mango marmalade is the perfect breakfast combo and the whole thing can be put together in under half an hour. Get the marmalade started and while it is simmering away, make and bake the yucca breads. There is even enough time in there to sip a cup of coffee! Thank you Claudia for introducing me to this simple, naturally gluten free recipe from Ecuador and for your appreciation of me putting my own spin on it with my sugar free spicy marmalade! Spicy Mango MarmaladeIngredients1 – 1 pound bag frozen mango chunks or 3 fresh mangoes cut into 1 inch chunks½ cup Organic Agave NectarZest of lime, finely gratedJuice of 1 lime1 red chili pepper (cayenne or Thai) seeds and veins removes and minced DirectionsCombine all ingredients in a heavy saucepan. Bring to boil, mash the mangoes with the back of a spoon or a potato masher. Reduce heat and let the mixture boil gently until thick, about 15 minutes. Let cool, mixture will thicken up more as it cools. Will keep for up to a week in the refrigerator. This gluten free recipe makes about 1½ cups of marmalade. Gluten Free Yuca BreadIngredients1½ cups tapioca flour (also called tapioca starch) plus more for kneading1½ teaspoons baking powder½ teaspoon kosher or fine sea salt2 large eggs2 ½ cups mozzarella cheese (low moisture part skim seems to work best), grated½ cup Parmesan cheese, grated¼ cup milk DirectionsPreheat oven to 350 degrees. Line a baking sheet with a silicon baking mat or a piece of parchment paper that is sprayed with gluten free non-stick cooking spray. Whisk the tapioca flour, baking powder and salt together in a large mixing bowl. Add the eggs, cheeses and milk. Using your hands, mix the ingredients together until it starts to form a dough. Dust a work surface with more tapioca flour, dump the mixture out onto the work surface and knead until the dough is not sticky, you may need to add a little more tapioca. Roll the dough into golf ball sized balls and place on prepared baking sheet. Bake for 18 – 22 minutes or until the breads are golden brown and feel firm to the touch. This gluten free recipe makes 14 – 16 breads. Want to know more about your favorite Gluten Free Recipe or how to avoid being bothered by Celiac with our range of Gluten Free Recipes which are made from Gluten Free raw material feel free to visit us at: http://www.simplygluten-free.com Article Source : http://simplygluten-free.com/blog/2011/08/gluten-free-yuca-bread-with-spicy-sugar-free-mango-marmalade.html
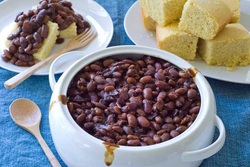 There are certain things that make me crazy, like when gluten is added to foods that are naturally glutenfree! Like canned baked beans! For crying out loud, why ADD gluten to beans? So I decided to make my own baked beans gluten-free recipe for a barbeque but I didn’t want to actually BAKE them because it is almost 100 degrees outside with like 99 percent humidity – ahhh… the joys of Florida in the summer! So with a little help of my slow cooker and a bag of Hurst Family Harvest Tri-Bean Soup mix, I made the most wonderful tasting gluten-free baked beans and kept my cool. They even had this fabulous smoky flavor without an ounce of bacon, thanks to the flavor packet in the bean mix. I really wanted to keep the recipe vegan for my sister but also please my g-kid Julian whose favorite food in the world is baked pork and beans. For a nice vegetarian or vegan meal, serve the beans over some gluten-free cornbread like we did – yummers! You need to plan ahead to make this recipe since the beans need to pre-cook and soak overnight but it takes very little work and I did the pre-cooking while I already had the kitchen heated up making dinner. Love this – do all the cooking at one time! Ingredients 1 packet Hurst Family Harvest Tri-Bean Soup Mix 8 cups water 1 cup chopped onion (about ½ medium onion) ¼ cup ketchup 1 tablespoon apple cider vinegar ½ cup molasses ¼ cup light brown sugar 1 teaspoon dry mustard ¼ teaspoon black pepper Directions The night before, combine the bean from the bean mix (reserve the flavor packet for later) and water in a large saucepan, bring to a boil, reduce heat to simmer and cook for 1 ½ hours. Pour the beans and the cooking liquid into a bowl, let cool and refrigerate overnight (8 -12 hours). In the morning, drain off all but 1 cup of the liquid and put the beans into a slow cooker with the reserved flavor packet and the remaining ingredients. Cook on low for 10 – 12 hours (you can cook longer if you like your beans softer). To concentrate the liquid more, turn the slow cooker to high for the last hour of cooking. Can be made several days ahead, it gets better and better with time. Store covered in the refrigerator. This gluten free recipe makes 10 servings. Want to know more about your favorite Gluten Free Recipe or how to avoid being bothered by Celiac with our range of Gluten Free Recipes which are made from Gluten Free raw material feel free to visit us at: http://www.simplygluten-free.com Article Source : http://simplygluten-free.com/blog/2011/07/gluten-free-slow-cooker-baked-beans.html
This is your new blog post. Click here and start typing, or drag in elements from the top bar.
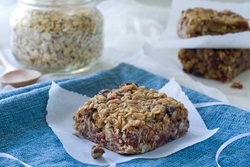 A glutenfree girl, a lactose intolerant boy and a tyke with a nasty peanut allergy get into a car… No, this is not the beginning of a joke, it was the beginning of a family day of adventure, off to trek through the Florida swamps, wrangle alligators, and to top it all off with a refreshing dip in the Gulf of Mexico. A long day and if it was going to be a fun day, allergy friendly snacks were required. Nothing can ruin a fun day like a carload of hungry, cranky kids! So along with fresh fruit, hummus and veggies, and an assortment of salty, gluten-free crackers and snacks, I made some allergy friendly granola bars. The base of these super allergy friendly granola bars is gluten-free rolled oats, Sunbutter (a nut-free peanut butter substitute), a mashedbanana, some melted Earth Balance dairy free butter substitute and coconut sugar. The recipe is almost more like a suggestion because you can elaborate any way you like. I filled mine with pumpkin seeds, dried fruit (a combination of cranberries, blueberries and cherries) and a handful of dairy-free chocolate chunks – healthy with just a touch of naughty, but you can make yours as naughty or nice as you like. Since I was feeding younger kids I used semi-sweet chocolate chucks but rich, dark chocolate would be fabulous. If you like coconut, throw it in! Tree nuts not a problem? Add some slivered almonds. Peanuts ok? Just use peanut butter. You get the idea. You can add up to a cup of additional items with no problem and substitute whatever type of seeds you like, a combination is fine too. Mine were fairly simple (due to a four year old palate) and thus were really moist and chewy, if you add in more stuff such as coconut or nuts, it may be a bit drier. I personally like salt mixed with my sweet so I sprinkled on a little more coarse salt before popping in the oven. I made these for the kids to keep them happy and well fed but to be perfectly honest, they were so delicious my sister and I almost hid them and kept them all for ourselves. (OK, I confess, we did hide a couple and had them for breakfast the next day. I know we are bad grown ups…) Oh, and in case you hadn’t noticed, these granola bars are not only gluten, dairy and nut free, they are also egg free, vegan and if you use coconut sugar and the Organic Sunbutter, they are also refined-sugar free! Seems the only thing there are not free of is amazing flavor! Granola Bars Ingredients ¾ cup Sunbutter (I like Natural Crunch but Creamy is good too) ½ cup coconut sugar, Sucanat or brown sugar 1 medium banana, peeled and mashed ½ cup butter or dairy free butter substitute, melted 1 tablespoon pure vanilla extract ½ – 1 teaspoon kosher or fine sea salt 2 ½ cups certified gluten-free rolled oats ½ cup roasted and salted pumpkin seeds 1 cup dried fruit, raisins or a combination – if using larger pieces of dried fruit, chop roughly ½ cup chocolate chunks or chips (optional – you can add up to a cup of additional ingredients such as coconut flakes, slivered or chopped nuts, flax, chia, sunflower or sesame seeds) Directions Preheat oven to 350 degrees. Spray an 8 inch by 8 inch baking pan with gluten-free, non-stick cooking spray. In a large mixing bowl, stir together the Sunbutter, sugar, mashed banana, melted butter or butter substitute and vanilla until well combined. Stir in the remaining ingredients until they are evenly distributed. Press the mixture firmly and evenly into the prepared pan. Bake for 30 – 35 minutes or until golden brown. Let cool completely and then cut into squares. Will keep wrapped in plastic wrap at room temperature for several days or in the refrigerator for up to a week. This gluten-free recipe makes 8 servings approximately 2 ¾ inches square. Want to know more about your favorite Gluten Free Recipe or how to avoid being bothered by Celiac with our range of Gluten Free Recipes which are made from Gluten Free raw material feel free to visit us at: http://www.simplygluten-free.com Article Source : http://simplygluten-free.com/blog/2011/07/granola-bars-gluten-free-dairy-free-nut-free.html
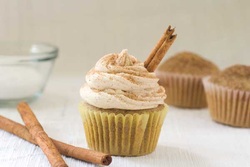
 I was having a conversation with my g-kid Julian about his following a glutenfree, dairy-free diet and he said to me “I just don’t want to have to worry about what I eat!” Of course he doesn’t, he’s 10! I know lots of grown ups who don’t want to worry about what they eat either. I believe the best way to get kids to embrace their diet, regardless of the intolerance, is to make them a part of the process of creating their food; everything from thinking up menus to shopping to cooking. The best part is enjoying the fruits of their labor. The other day the g-kids and I planned a whole menu for my son’s birthday, everything was gluten and dairy free and it was abundant; we had London Broil, grilled tilapia, dairy-free mashed potatoes, gluten-free pasta salad, a mixed salad filled with all sorts of fresh veggies and of course a gluten-free birthday cake. The kids came up with the menu, prepared the marinade for the beef, peeled the potatoes, picked basil from the garden and tasted, laughed and enjoyed themselves. They even set and decorated the table. It was a great day and an even better dinner. A couple days later we actually worked on developing our own recipe together. We decided to make cupcakes and Miss Milla wanted to make a cupcake that tasted like ONE of her favorite cookies (emphasis on ONE because, as per her, it is simply not fair to the other cookies to pick just one favorite) the Snickerdoodle. What a joy to bring the kids into the whole creative process of developing a recipe, they gave their opinions, stirred and wrote down notes and we had a marvelous time, especially when it came to taste-testing. We kept it easy and started with a packet of Kinnikinnick White Cake Mix which is not just gluten-free but dairy free also. We added cinnamon and vanilla and then topped the cupcakes with cinnamon sugar to replicate the coating from the original inspiration – the Snickerdoodle Cookie. Then we came up with a dairy free “butter” cream frosting and topped it all off with just a tad more cinnamon sugar. The verdict? See for yourself. Gluten Free Dairy Free Snickerdoodle Cupcakes Ingredients Topping: 6 teaspoons sugar 1 teaspoon cinnamon Cupcakes: 4 large eggs ¾ cup grapeseed (or other neutral tasting) oil ¾ cup cold water 1 teaspoon pure vanilla extract 1 Kinnikinnick White Cake Mix 1 teaspoon ground cinnamon Frosting: ½ cup Earth Balance (or other dairy free butter substitute) 4 cups powdered sugar 1 teaspoon ground cinnamon 1 pinch kosher or fine sea salt 2 teaspoon pure vanilla extract 2 – 6 tablespoons rice milk (or other dairy free milk) Garnish – Optional 6 cinnamon sticks, each one broken into thirds. Directions Preheat oven to 350 degrees. Line 18 standard muffin tins with paper liners. Combine topping ingredients in a small bowl. Combine eggs, oil, water and vanilla in a mixing bowl and whisk (either by hand or with a handheld mixer) for 2 minutes. Gradually add the cake mix and cinnamon, whisk just until combined. Wisk just until combined, mixture will be a little lumpy. Divide batter among prepared muffin tins. Sprinkle about ¼ teaspoon of the topping on each cupcake. Bake for 20 minutes or until risen, lightly browned and a tooth pick inserted in the center comes out clean. Let cool. While cupcakes are cooling, make the frosting. In the bowl of an electric mixer, preferably fitted with a paddle attachment, beat the Earth Balance until smooth. Add the powdered sugar. Cinnamon, salt, vanilla and 2 tablespoons rice milk. Start with the mixer or low and combine. Gradually add more rice milk until the mixture becomes a spreadable consistency. Turn mixer up to medium-high and beat for 30 seconds or so until very creamy. Frost the cooled cupcakes. Sprinkle the frosting with the remaining topping. Insert a piece of cinnamon stick into each cupcake cake if desired. Cupcakes and frosting can be made several days ahead. For best results store cupcakes unfrosted in the fridge, covered with plastic wrap. Store frosting separately in a covered container in the fridge. Let frosting come to room temperature before frosting cupcakes. Frost the cupcakes no longer than a few hours before serving. Makes 18 gluten-free, dairy-free cupcakes Ready for dessert? Want to know more about your favorite Gluten Free Recipe or how to avoid being bothered by Celiac with our range of Gluten Free Recipes which are made from Gluten Free raw material feel free to visit us at: http://www.simplygluten-free.com Article Source : http://simplygluten-free.com/blog/2011/07/gluten-free-snickerdoodle-cupcakes-dairy-free.html
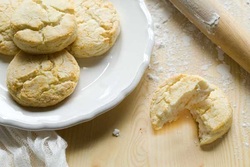 Glutenfree baking can be complicated, fraught with trial and error (emphasis on the error) and frustrating. However I am happy to report that making gluten-free biscuits need not be as difficult as some would have you believe. There are those that will tell you the only way to get perfect baking results is to weigh your flours, measure very carefully, calibrate your oven and what not. While this may be true for some things, I have found that biscuits are very forgiving. Think about it, pioneer women mixed up their biscuits on the “road” in the back of a covered wagon and “baked” them over a campfire. Probably while making sure their children weren’t bitten by snakes and fending off hostile natives not too happy with the intrusion, all the while wearing a corset. Seriously, how much time did they have for carefully weighing their flour? I have found that gums such as xanthan and guar are not necessary in gluten free biscuits, just some type of gluten-free flour and a starch mixed with baking powder and salt. I like my biscuits white and fluffy so I prefer superfine white or brown rice flour but if you want to use another type of gluten free flour such as millet, sorghum, quinoa, etc. or any combination thereof, then go right ahead. For starch I prefer to use either tapioca or potato starch but you could also use cornstarch or arrowroot powder. Again, you can also use a combination of starches if you prefer. After you pick the type of flour and starch you want to use, it is simply a matter of adding some fat and liquid. The type depends on your taste and dietary needs. Personally I like to use butter for my fat and milk for my liquid but Earth Balance, shortening or even bacon fat and any type of dairy-free milk works really well for dairy free biscuits. Just make sure your fat and liquid are cold. Once you have made all your decisions the thing to keep in mind is to use a light hand, don’t overwork the dough. The less you work it, the lighter and flakier the biscuit. And when you add the fat to the flour make sure you keep some larger chunks in there, this is also important for flakiness. When it comes to adding the liquid, start with less than the recipe calls for and add just enough to form the mixture into a dough, various factors such as humidity can affect how much is needed. You may even need a tad more than the recipe calls for. You can roll and cut out your biscuits or drop them by spoons onto a baking sheet. I prefer to pat out my dough rather than rolling it out with a rolling pin. It is easier and there is one less thing to wash. I guess the most important thing to keep in mind is not to be intimidated. Really, what’s the worst that could happen? You bake little hockey pucks and try again. The best that could happen? You have warm, flaky, light biscuits warm from the oven ready for a slathering of jam – a little piece of heaven. Gluten Free Biscuits Ingredients 1½ cups superfine white or brown rice flour plus more for rolling ¾ cup tapioca or potato starch (not potato flour) 1 tablespoon baking powder 1 teaspoon kosher or fine sea salt 6 tablespoons cold fat (such as butter, Earth Balance or shortening), cut into small pieces ¾ cup milk (any kind including dairy free) Directions Preheat oven to 400 degrees. Line a baking sheet with parchment paper or a silicon baking mat. Whisk together the flour, starch baking powder and salt. Cut the fat into the flour either with a pastry cutter, two knives or by rubbing the fat into the flour with your fingers. Make sure you leave some larger pieces of fat. Add the liquid, starting with ½ a cup and gradually adding a little more at a time, mixing until the dough comes together. Put a little flour on a work surface and dump out the dough. Knead 3 or 4 times then either roll or pat it out to about ½ inch thick. Cut into biscuits using a 2 ½ inch cookie cutter. You can gently reform the dough to cut more biscuits. Place the biscuits on the prepared baking sheet and bake for 20 minutes or until lightly browned. Serve warm. Makes approximately 12 gluten free biscuits depending on the size. Want to know more about your favorite Gluten Free Recipe or how to avoid being bothered by Celiac with our range of Gluten Free Recipes which are made from Gluten Free raw material feel free to visit us at: http://www.simplygluten-free.com
Article source:http://simplygluten-free.com/blog/2011/07/gluten-free-biscuits.html
|
 RSS Feed